If you’re privacy-conscious but don’t wanna use VPNs or private browsers, a WiFi proxy might be the simpler solution. But what is proxy in WiFi, and how do they offer a better user experience than other options?
Proxy in WiFi is nothing rocket science; it simply means configuring a proxy on your WiFi connection. Setting a proxy over WiFi routes your browser and app traffic through proxy servers, keeping your actual identity anonymous.
This method works for all websites and the majority of the apps out there, if not all.
In this article, we’ll show you how to set up a proxy in WiFi settings for both Android and iOS devices. But before we start with the steps, it’s important to cover some basics.

Table of Contents
What Is Proxy in WiFi?
A proxy server is like a middleman between your device and the internet. When you visit a website, your request goes through the proxy server first before reaching the internet. The server then sends the response back to your device.
It gives you a random or fake IP address and makes it look like the request came from the proxy itself. These anonymous proxies can improve your internet connection by adding layers of privacy, security, and sometimes even speed.
On WiFi networks, your device constantly exchanges data with external servers to load web pages, stream videos, and more. Without a proxy, your real IP address is directly accessible to all the websites you visit. However, with a WiFi proxy in place, any data going in or out first passes through proxy servers.
They hide your device’s location and make sure everything is secure before allowing it to pass. Secure connections are especially useful on public WiFi to protect internal network details from high potential threats.
We hope it’s clear what is proxy in WiFi by now, but why would you need it in the first place? Let’s explore some use-cases.
Why Use a Proxy With WiFi in the First Place?
Best proxy sites or servers have similar use cases as VPNs. Both of them let you anonymize your identity while accessing online services or websites. Here are three specific reasons to use WiFi proxies.
Bypass Geo-restrictions
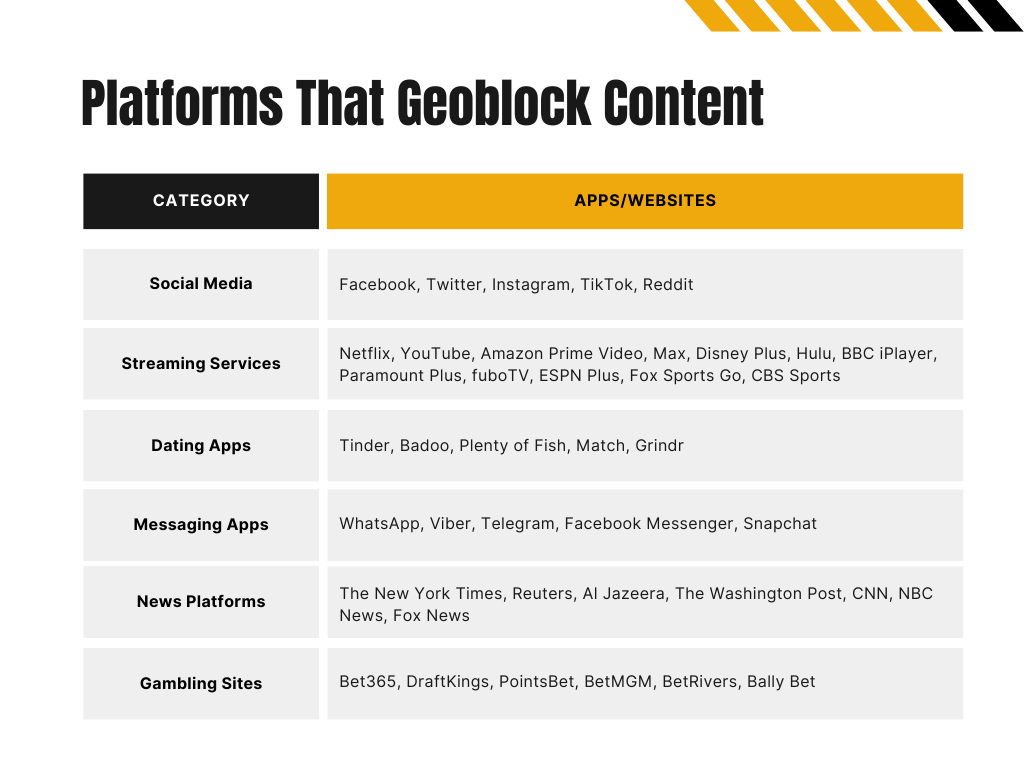
Geo-restrictions are those frustrating blocks that prevent you from accessing content just because you’re in the wrong country.
Platforms like Netflix and Spotify frequently use this tactic. Businesses offering services in specific locations also place geo-restrictions on their websites.
A proxy server in a specific region can help view sites from another country and access specifically restricted content. It makes your browsing appear as if you’re located there.

Improves Privacy
Proxy servers protect your online identity from prying eyes by masking your IP address. They also keep your browsing habits and location under wraps.
This is particularly valuable for individuals concerned about data tracking by advertisers, websites, and surveillance agencies.

Bypass IP Bans
IP bans happen when a server blocks your device’s IP address, often because it suspects rule-breaking. For example, some online games, like League of Legends, might ban players’ IPs for suspected cheating or violating ToS.
While bans for legitimate cheating make sense, they can very well result from human error or the misinterpretation of algorithms.
Connecting through a proxy lets you jump back into your favorite game without that frustrating banned message popping up.
Let’s explore how to set proxies up. First, we’ll discuss the iOS method for which we’ll need to understand what is configure proxy in WiFi.
What Is Configure Proxy in Wifi?
On an iPhone, the Configure Proxy setting is a feature under the WiFi options. It allows users to manually input proxy server settings for a specific WiFi network they’re using. This means you can route your internet traffic through a proxy server of your choice.
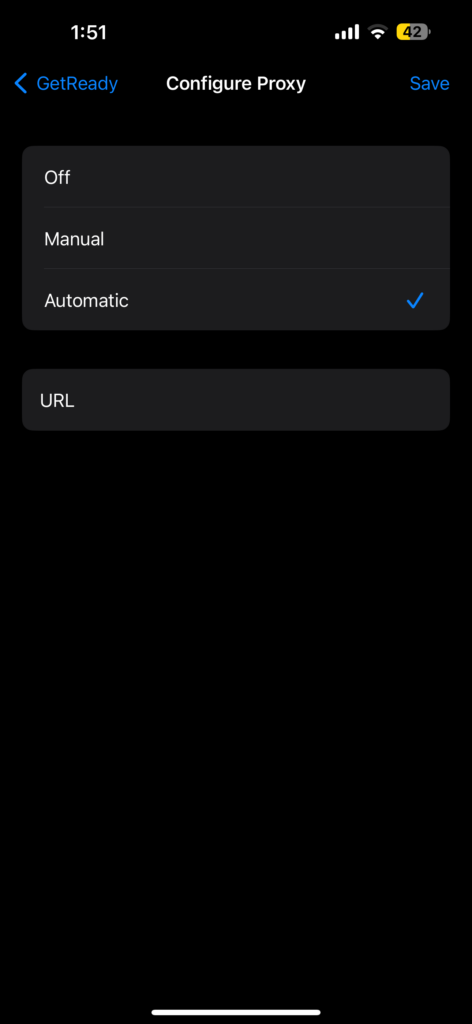
When you go into Configure Proxy, you’ll see two main options: Automatic and Manual. If you choose Automatic, it tells your iPhone to find and configure the proxy settings on its own. This usually involves a script that the network administrator (commonly known as a PAC file) provides.
However, in Manual configurations, you’ll need to enter the proxy server’s IP address and the port number yourself.
Android devices have similar settings for manual and auto configuration but with different names.
Configuration also depends on the proxy type you’re dealing with. There are different types, including transparent proxies, residential proxies, and others.
5 Steps To Configure Proxy Server Settings on iOS
Simply knowing what is a proxy in WiFi is of no use if you don’t know how to configure it. If you’re using an iPhone, follow these steps:
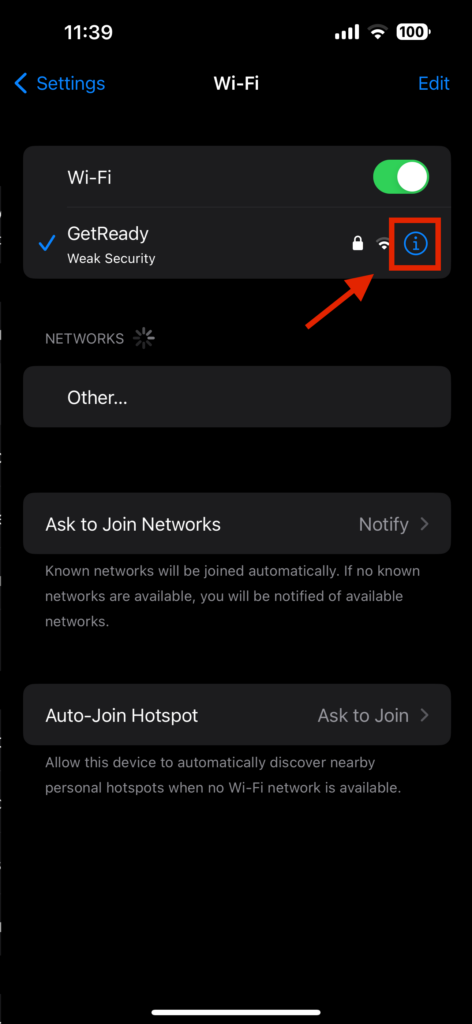
- Access WiFi settings: Open the Settings app on your iPhone and tap on WiFi. Find your WiFi connection and tap the small information icon (ℹ) next to it.
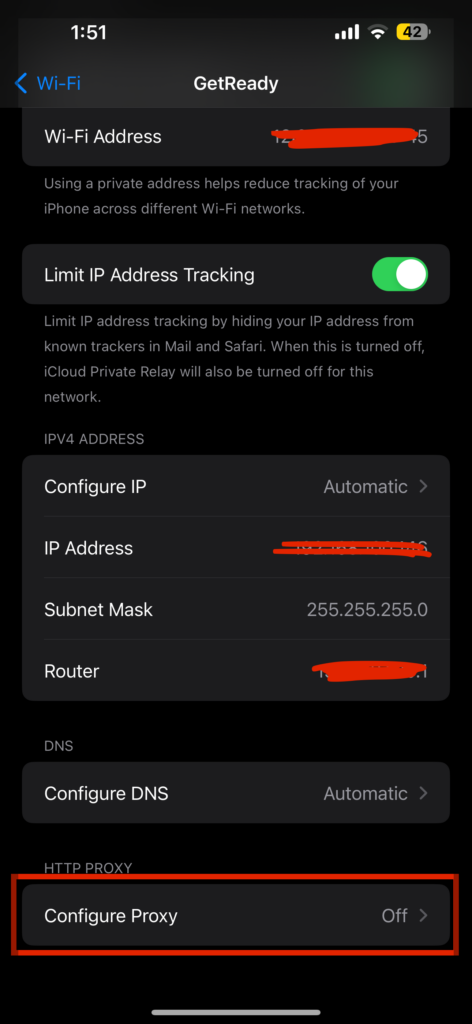
- Select configure proxy: In network settings, scroll down to the HTTP Proxy section, where you’ll find Configure Proxy.
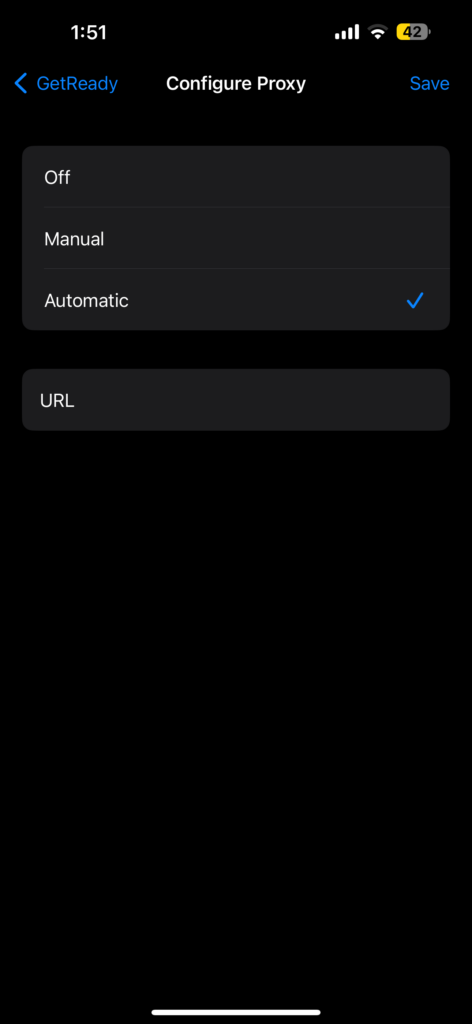
- Choose manual or automatic: You’ll now have two options to configure your proxy: Automatic and Manual.
- Automatic: If you choose this, you must enter the URL for the proxy auto-configuration script, also known as a PAC file. The network admin usually provides this script.
- Manual: If you choose manual, you must input the proxy server’s IP address or domain name and port number.
- Enable authentication (if required): Some proxy servers need authentication to allow access. If this is the case, turn on authentication and enter the username and password the proxy service has provided.
- Save settings: Verify all details and hit Save.
Steps To Configure WiFi Proxies on Android
Let’s elaborate more on what is proxy in WiFi by showing you the steps for configuring it on Android devices.
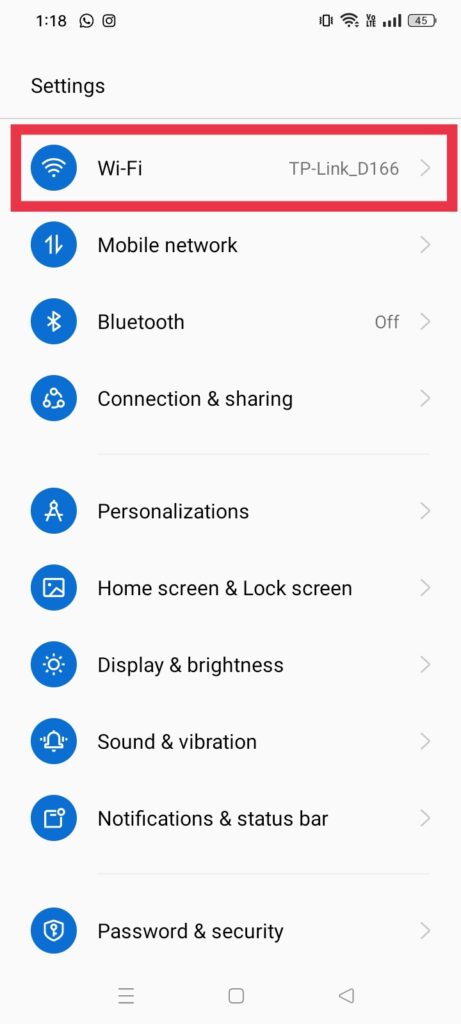
- Access network settings: Open the Settings app. Tap Network & Internet (or something similar, depending on your phone). Then, tap WiFi.
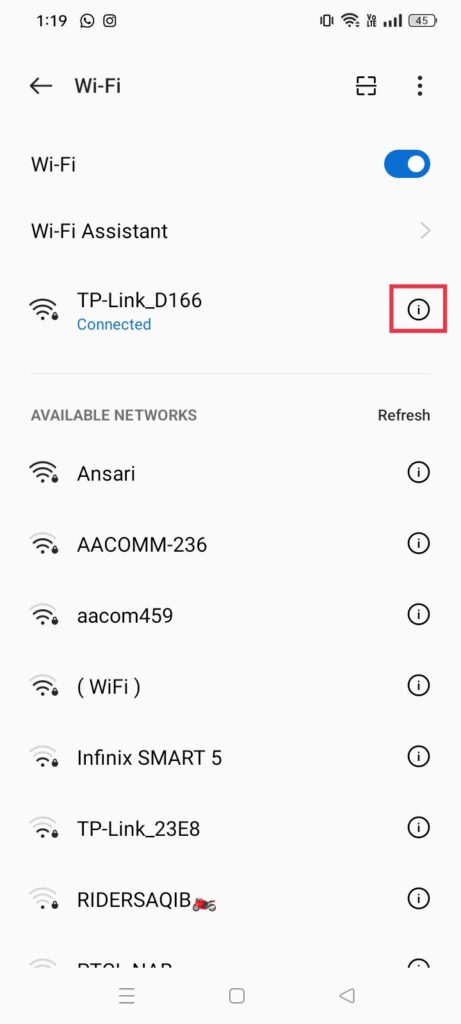
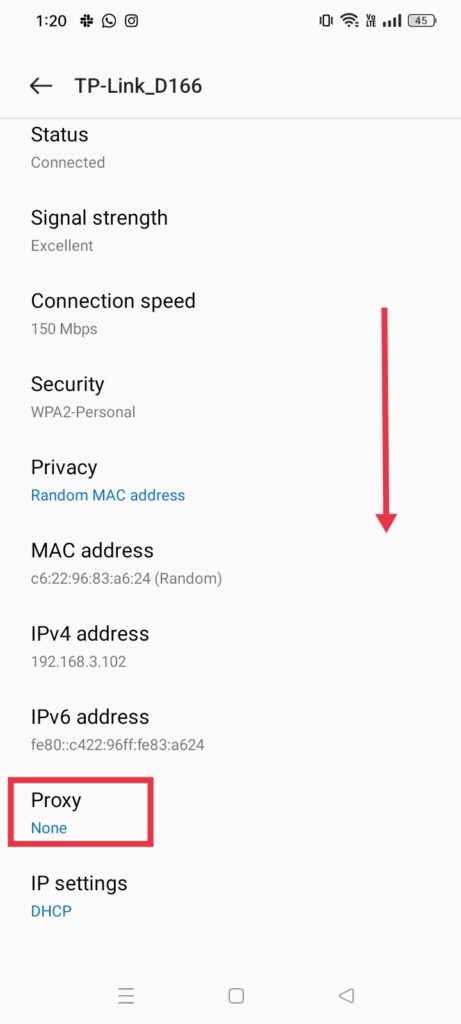
- Modify network: Find the WiFi network you’re using, then long-press it. A menu will appear — tap Modify network. On some devices, you might need to tap the gear or the information icon next to the network name instead. Then, scroll down and find the Proxy settings.
- Select advanced options: After selecting Modify network, scroll down and tap Advanced options. Look for the Proxy sections where you’ll set up the proxy.
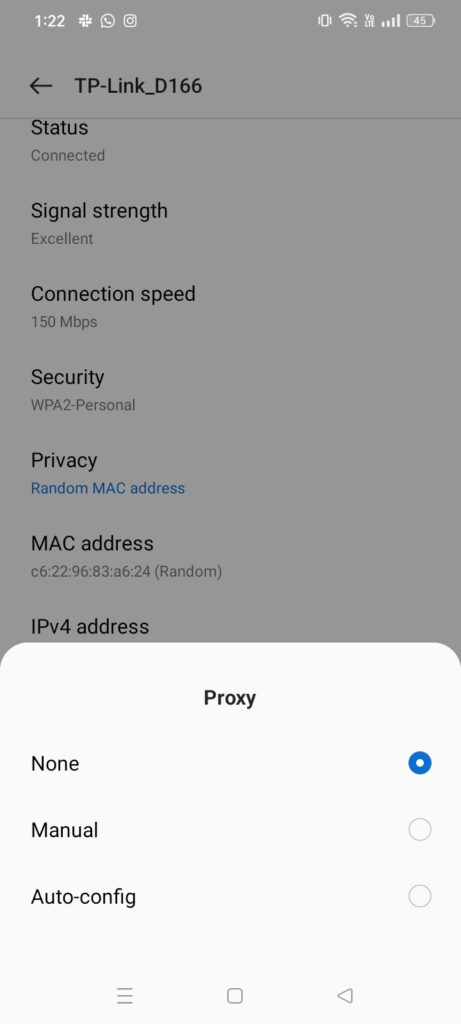
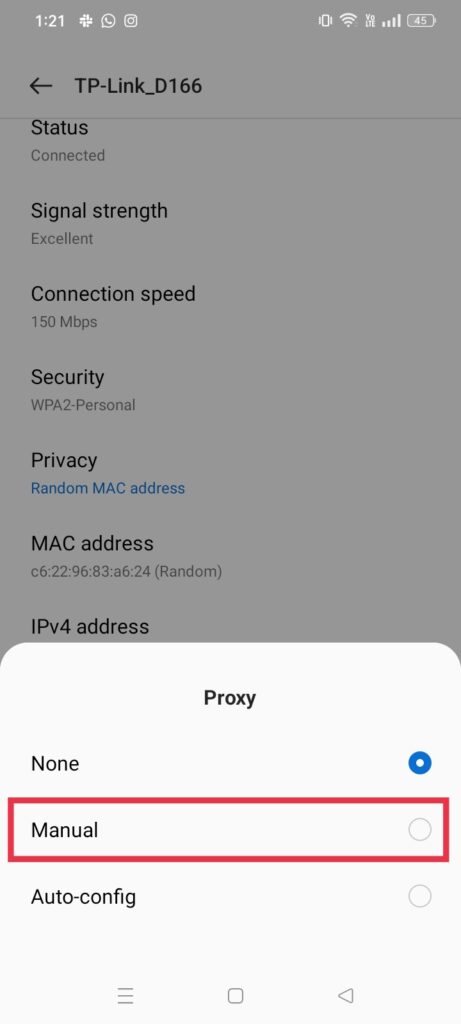
- Choose proxy settings: You’ll now see a few options for proxy settings: None, Manual, and Proxy Auto-Config.
- None: This means no proxy is in use.
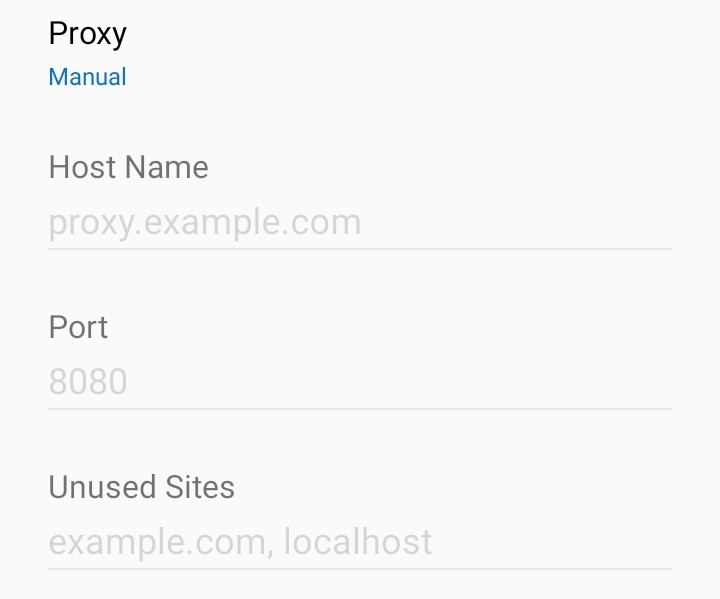
- Manual: If you select Manual, you’ll need to input the IP address and port number of the proxy server manually. There might be a third field where you mention sites that shouldn’t use the proxy.
- Proxy auto-config: For networks using a PAC (Proxy Auto-Config) file, you’ll need to enter the URL for the PAC script. This script automatically configures the proxy settings according to the network requirements.
- Save configuration: After entering all the necessary information, don’t forget to hit Save.
FAQ
Here are some more answers to help you understand and configure proxies.
What is proxy settings in Wifi?
Proxy settings in WiFi allow you to route your internet traffic through a proxy server. A proxy server replaces your actual IP address with one of its own.
Anonymity proxies keep online identity private from websites, advertisers, and surveillance agencies.
How can you check Wi-Fi proxy settings?
To check Wi-Fi proxy settings, go to your device’s network settings. On iOS, go to Settings > WiFi, tap the network, and select Configure Proxy.
On Android, go to Settings > Network & Internet (or something similar) > WiFi > Modify the network. Some Android devices may have slightly different settings.
How do I know if my Wi-Fi is using a proxy?
You can tell if your WiFi is using a proxy by checking the network settings on your device. If you’re on Android and proxy settings say none, there’s no proxy in use.
But your WiFi connection may use a proxy if it’s set to Manual or Auto-config. Similarly, if your iPhone Configure Proxy is set to Off, there’s no proxy in use.
Analyze Website Traffic With geoPlugin!
For some users, knowing what is proxy in WiFi and how to set it up remains the last option. However, cybercriminals use proxies with intent to harm websites without revealing their identity. For example, they can configure WiFi mobile proxies in several mobile devices and use them for a DDoS attack.
To protect against such attacks, it becomes necessary to have preemptive measures in place and block suspicious IPs.
You can use geolocation services like geoPlugin to determine information about each IP address visiting your website in real-time.
geoPlugin can reveal an IP’s physical location, including country, city, and even approximate geographical coordinates. By monitoring IPs and their activities, you can block the ones generating unusual traffic.
The best part about geoPlugin is that it offers free IP lookups. So, if you’re a small business, you may not have to subscribe to paid plans.
Start today and sign up to get geoPlugin’s free geolocation API!


