Meta, with its lineup of platforms like Facebook, Instagram, and WhatsApp, allows you to reach global audiences with your ads. But yet, marketers often struggle to land their ads right where they want them. A common reason is the inefficient use or lack thereof of geofencing in Facebook
This guide will walk you through how to perform this process in detail. You’ll also understand how Meta chooses who actually sees your ads. Let’s begin.
Table of Contents
How To Use Geofencing in Facebook: 6 Detailed Steps
Facebook allows geofencing physical locations for more precise ad targeting. It calls this feature Location Targeting. Here’s a breakdown of how to use this feature.
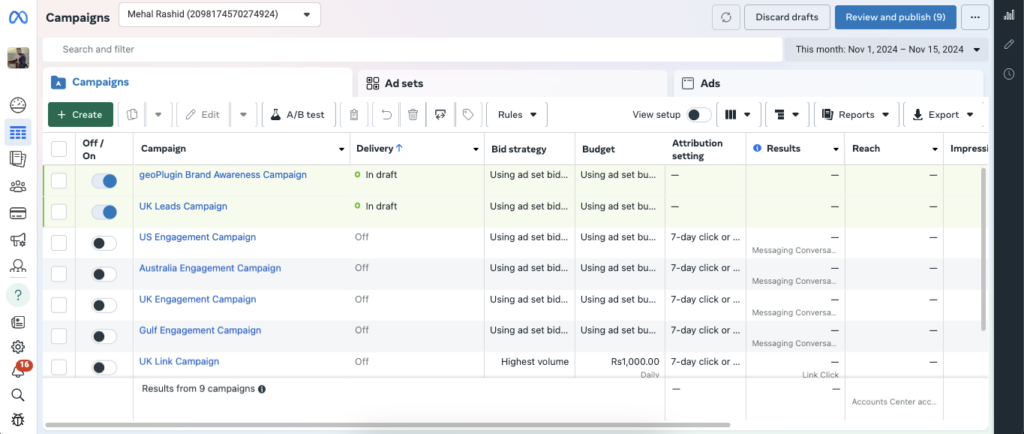
Step 1: Visit Ads Manager via Meta Business Suite
Geofencing in Facebook requires you to first access Facebook Ads Manager. You can access Ads Manager through your personal account. However, to publish ads, you need to set up or have access to a Facebook page.
Facebook requires you to have a page for most ads, as that’s what will appear as the business you’re promoting.
Step 2: Create An Ad Campaign & Choose Campaign Goals
Now that you’re in Ads Manager, you need to create an ad campaign for geofencing in Facebook.
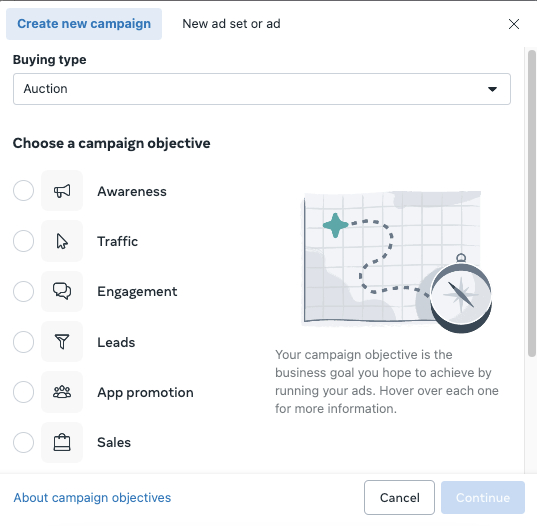
Click on Create in the dashboard to set up a new campaign. Creating an ad campaign requires you to pick an ad objective out of six options. These objectives are business goals you hope to achieve by running your ads.
Here’s a quick look at each one:
- Awareness: If you’re trying to reach a fresh audience or stay top-of-mind with existing customers, Awareness is your go-to. Within Awareness, you can focus on:
- Reach: Show your ad to as many people as possible, maybe even to draw them into your physical location.
- Brand awareness: to introduce your brand to new audiences or shift how people perceive you.
- Video views: for those using video content to reach viewers more likely to engage.
- Traffic: Where do you want to send people who click on your ad, website, app or to start a conversation with your business on Messenger or WhatsApp? Traffic campaigns are ideal especially if your focus is more about informing and engaging than making a hard sell to potential customers.
- Sales: If your main goal is getting high conversion rates, i.e., you want people to buy, subscribe, or sign up, choose Sales. This objective finds people across Facebook, Instagram, and Messenger. People who are most likely to make a purchase or take some other action you want.
- Engagement: Engagement campaigns are for those moments when you want more interaction. Interaction can include likes, comments, shares, or event RSVPs.
- Leads: Lead generation ads are great for gathering info from potential customers and guiding them toward a purchase. These ads can include messages, instant forms, or calls to make that connection easy.
- App promotion: This option can help boost app installs and target audiences more likely to use and convert to your app. For example, if business owners are launching a new app, this ad objective is for them.
An ad objective sets the direction for your entire campaign, so choosing the right objective is critical. You can check out Meta’s official guide to learn more.
Step 3: Create New Audience & Select Locations
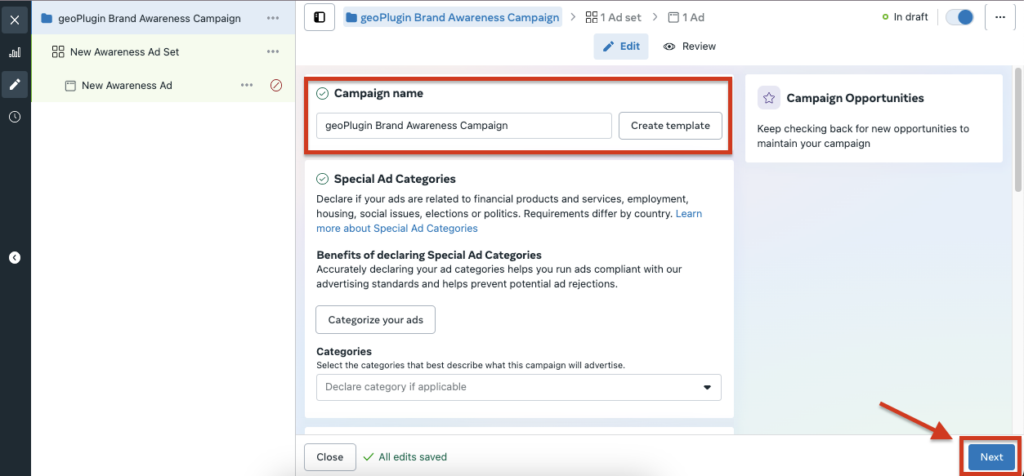
Now, you’ll create a new ad set (give it a name). After clicking on it, it will prompt you to a screen where you can set the name for your campaign. Click on Next after setting the name.
On the next screen, you’ll see fields for Ad Set Name, Budget, Schedule, and so on. Go ahead and fill in these fields based on your marketing goals.
Next, scroll down to the Audience Controls section. Here, you’ll see the Locations sub-section. This is where you’ll be actually geofencing in Facebook.
You’ll be able to define a virtual boundary that includes your target audience the best.
You have the following three ways to make these virtual boundaries:
Enter Locations
If you already know where your audience is, simply start typing in the names of specific countries, cities, or regions.
Facebook’s geofencing options are incredibly flexible. You can target individual physical locations or bulk upload all your target locations in one go.
For instance, you can enter up to 25 countries, 250 cities, or even 50,000 postal codes in one go. If you’re working in US locations, you can narrow down even further to target specific states, provinces, or congressional districts.
Browse Locations
The Browse feature is your friend if you’re not sure where to target. This lets you check out pre-suggested locations or search within countries and regions that have high foot traffic.
You can even get location ideas by entering a country name to view popular cities within it.
Choose a Location Radius
Want to get hyper-local? Use the Drop Pin feature, place a pinpoint on the map, and adjust your reach using a radius slider.
Radius targeting allows for a 1-mile radius at minimum to a broader 50-mile radius. You can cover a neighborhood, a town, or even extend beyond a city’s natural boundaries.
Note: With any location targeting option, your ads will reach people who live in or have recently passed through your selected area.
Step 4: Exclude Unwanted Areas From Selected Locations
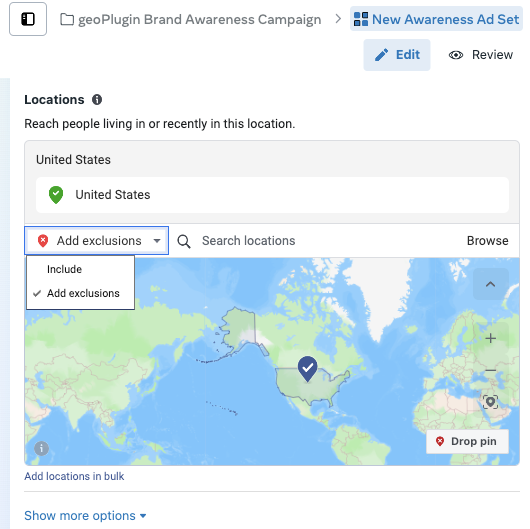
Don’t want to target a specific physical location within your selected area? You can cut out certain areas within your larger target zone to get an optimal radius.
For this, click on the drop-down labeled Include next to the location search bar and switch it over to Exclude.
Now, just like when you’re adding locations, you can perform location exclusions either by:
- Typing in the names of areas to exclude
- Browsing for specific places
- Using the Drop Pin tool for total precision
Step 5: Look Into the Demographics and Do Detailed Targeting
Now, let’s define the target audience you actually want to reach during the geofencing and geotargeting process.
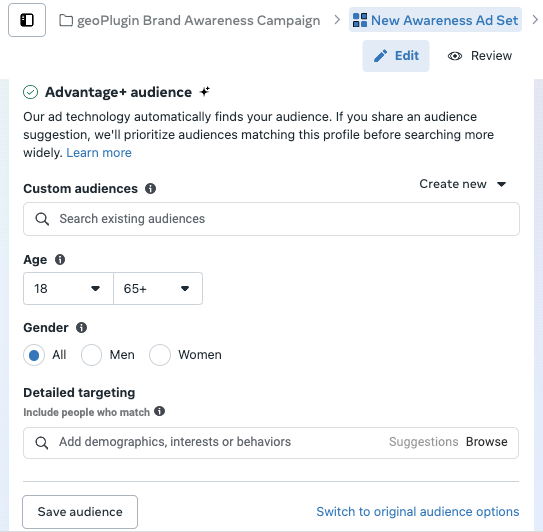
Right under the location box, you’ll see some settings, including age and gender. Adjust these settings according to your campaign requirements.
You’ve also got the Detailed Targeting feature that lets you narrow in on people’s demographics, interests, and behaviors.
This is where geofencing in Facebook flexes its real power. For example, you can target interests like Car Rentals, Agriculture, Banking and much more.
Just start typing in a keyword to get suggestions or select Browse to see a long list of categories.

Step 6: Launch & Monitor the Campaign
Having set up everything at the Ad Set level, hit Next to move on to the final Ad level.
Here, you’ll name your ad, upload your creative, and select the destination to send potential customers who click your ad.
After you’re happy with your setup, press Publish. From here, Facebook Ads Manager becomes your control center to monitor how your campaign is doing.
How Meta Decides Who Sees Your Ads
Once you hit Publish, your ad doesn’t just go straight to your target audience. It enters an “ad auction” competition.
Your ad isn’t the only one vying for your audience’s attention. There are other contenders, too.
To increase your chances in this ad auction for geofencing in Facebook, Meta emphasizes five essentials:
- Choosing the right objective
- Accurate targeting
- A solid budget
- Enough duration
- Compelling ad creative
For ad quality, Meta checks things like whether your ad:
- Withholds information
- Uses sensationalized language
- Relies on engagement bait (like asking users to “like” or “share” just to boost interaction)
So, before launching geotargeting ads, it’s a good practice to review Meta’s Advertising Standards to ensure everything’s in line. This can help you avoid rejections and make the most of your marketing efforts.
Let geoPlugin Help You With Geofencing Target Audiences
Geofencing in Facebook is a great tool to highly control who sees your ads. But what if your target audience lies outside the Facebook platform? To create your geofences, you’ll need the help of third-party geolocation services. geoPlugin is one of the leading and earliest geolocation providers.
It allows you to collect raw location data for geofencing using IP addresses. Every minute, you can geolocate up to 120 IPs that visit your website for free. The data you receive includes city, country, zip code, time zone, geographical coordinates, and more.
So sign up for geoPlugin today and gather accurate data for your geofences.
FAQ
Can I target multiple geofences in a single Facebook ad campaign?
Yes, you can target multiple locations in a single Facebook ad campaign. In the Audience section under Locations, add multiple addresses or areas to create multiple geofenced areas within a single campaign.
How do I select the best audience for my Facebook ads?
You can use Facebook’s targeting tools like demographic, interest, and custom audience targeting. Testing various audience types and adjusting based on ad performance will help refine your results.
What are the benefits of using geofencing for Facebook Ads?
Using geofencing has several benefits. The most important one is that you can target your audience in very specific locations. By doing this, you can get more people to your site and increase sales.
How can I test different targeting options in Facebook ads?
Use A/B testing or split testing in Facebook Ads Manager to compare how different audience setups perform.

